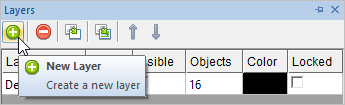
We have a lot of curves displaying on the part. Let's clean them up. 1.Display the Layer Manager. You can pick the Layer Manager icon 2.From the Layer Manager select the Add Layer icon
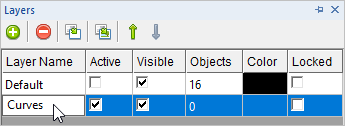
3.Now lets rename the new layer to Curves. First double-left-click in the Name field to activate it, and enter Curves as the new layer name. 4.Next lets make the Default layer the Active Layer by checking the box in the Active column for the layer Default. The Default layer is now the active layer. Let's also uncheck the box in the visible column for the Curves layer. Now any geometry placed on the Curves layer will be hidden from view. Your Layer Manager should look like the one shown below.
5.Now VisualCAD has a quick way of selecting entities by type. Go to the Modeling Aids
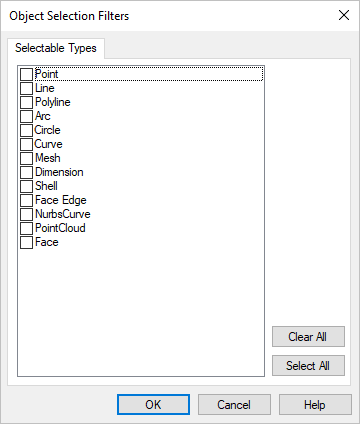
6.Place a check mark in the box for each of the following entity types: Point, Line,Polyline, Arc, Circle, and Curve.
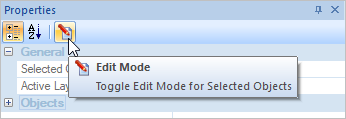
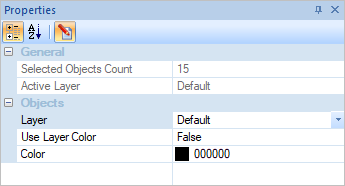
7.Now pick the OK button. You will see that all of the reference curves we created in this exercise are highlighted for selection. 8.With the entitles selected, select the Properties 9.The Properties Manager will display on the left side of the screen similar to the Layer Manager. 10.At the top of the Properties Manager select the Edit
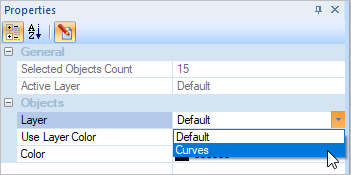
11.We want to change the layer of the curves so drop down the layer menu by selecting the menu indicator
12.Now when you click anywhere in the drawing window you will see that all of the curves have been moved to the Curves layer and are not hidden from view.
|