 In professional CNC machining, the way you hold your part is just as important as how you cut it. Fixtures, clamps, and vises are essential for stability, but they also represent "no-go zones" for your cutting tools. A single miscalculation can lead to a broken tool, a damaged spindle, or a ruined fixture.
Contents
Moving Beyond Global Fixture Settings
How to Assign Fixtures to Specific Setups
Automated Avoidance and Clearance Distances
Why This Matters for Your Shop
Frequently Asked Questions (FAQs)
What is the major change to fixture support?
Which operation types support these new fixture settings?
How does the software handle tool paths when they encounter a fixture?
How do I assign a fixture to a specific setup?
Can I set a specific safety buffer around my clamps?
Pro-Tips for RhinoCAM & VisualCAD/CAM
Double-check the Select Fixtures for Setup tab
Introduction
In our latest technical highlight, MecSoft Corporation introduced a significant workflow improvement in the 2026 release of VisualCAD/CAM: Fixtures per Setup. This update moves fixture management from a global setting to a more granular, setup-level control, providing both flexibility and increased safety.
Moving Beyond Global Fixture Settings
In previous versions of the software, once you defined fixtures, they were generally applied to the entire machining job. While effective for simple parts, this was limiting for multi-stage operations where clamps might be moved, added, or removed between different setups.
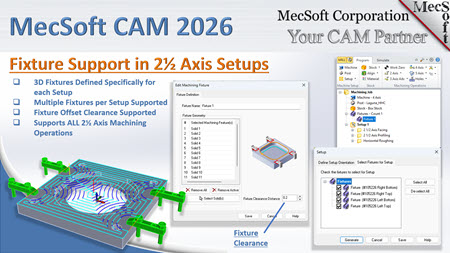
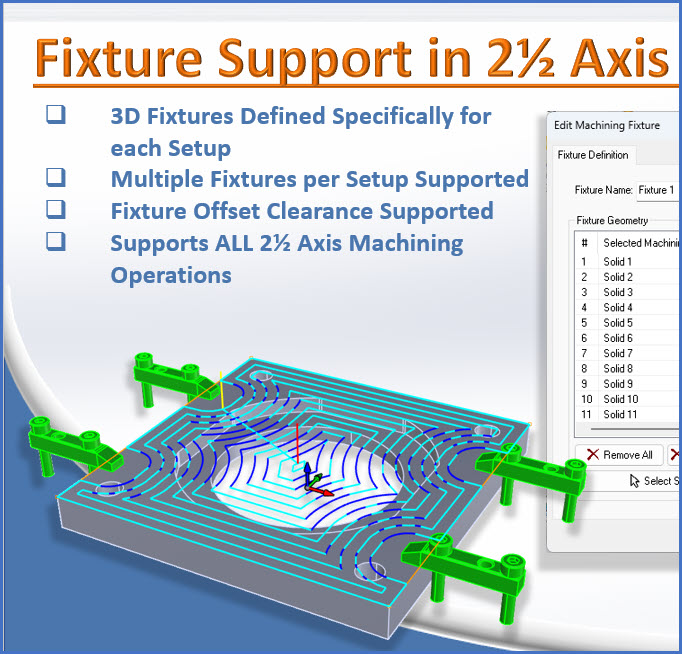
In the 2026 release, fixture support is now applied to all 2.5-axis operations at the setup level. This means that the software understands that the clamping situation in "Setup 1" might be completely different from "Setup 2."
How to Assign Fixtures to Specific Setups
The process is designed to be intuitive and integrated directly into your existing workflow:
1.Define Your Fixtures: First, you define all your clamps, vises, or fixtures under the "Fixture" item in the machining job tree as you normally would.
|
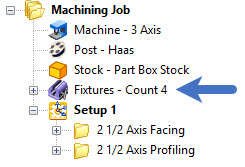
2.Access the Setup Dialogue: Double-click on your specific setup (e.g., Setup 1) to open the setup dialogue box.
|
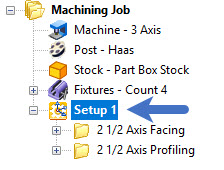
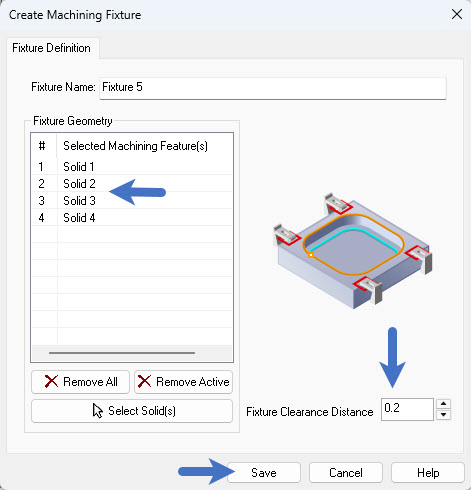
3.Select Fixtures for Setup: You will see a new tab specifically for fixtures. Here, the software lists all the fixtures you’ve previously defined. You can simply check the boxes for the specific clamps that are active for that specific setup.
|
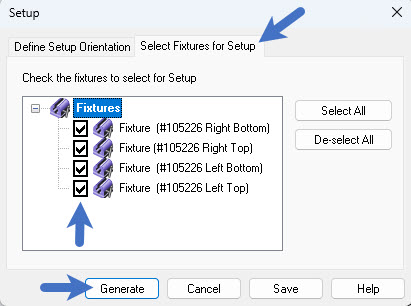
4.Automatic Honoring: Once assigned, every operation within that setup—whether it's facing, profiling, or pocketing—will automatically honor those fixture definitions.
|
Automated Avoidance and Clearance Distances
One of the most powerful aspects of this new feature is how the toolpath reacts to the fixtures you’ve selected.
Fixture Clearance Distance
You can now set a specific fixture clearance distance. This value (for example, 0.2 inches) tells the software exactly how much "breathing room" to maintain between the tool and the clamp.
•The tool path will stay away from your fixture by the exact amount you specify.
•This applies to the tool body and the holder, ensuring total clearance.

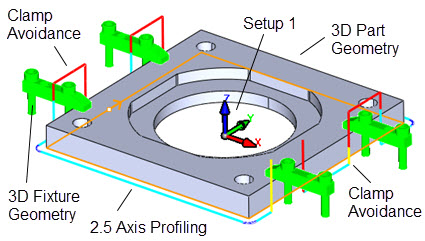
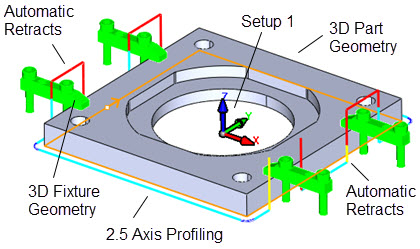
Intelligent Toolpath Retracts
You no longer have to manually create boundaries or "islands" to avoid your clamps. During the webinar, we demonstrated a profiling operation where the tool encountered a side clamp:
•The software automatically calculated the intersection.
•It generated an automatic retract and travel move to go around the fixture.
•It then plunged back in to continue the cut once the obstacle was cleared—all without any manual geometry selection.
Why This Matters for Your Shop
The ability to define fixtures per setup is more than just a convenience; it’s a major safety and efficiency upgrade:
•Multi-Sided Machining: Easily manage parts that require flipping or re-clamping by assigning different fixtures to different orientations.
•Reduced Programming Time: Eliminate the need to draw custom 2D boundaries to "steer" the tool away from clamps.
•Safety First: By defining a clearance distance, you create a digital buffer that protects your hardware from human error.
•Dynamic Simulation: When combined with our simulation engines, you get a highly accurate visual representation of the tool navigating around your real-world work-holding.
Frequently Asked Questions (FAQs)
Based on the webinar segment from MecSoft Corporation regarding the 2026 updates for VisualCAD/CAM, here are the FAQs and Tips for using the new Fixture Support features:
•What is the major change to fixture support?
In previous versions, fixture definitions applied to the entire machining job. Now, you can assign specific fixtures to individual setups within a single job.
•Which operation types support these new fixture settings?
The new fixture support and clearance distances apply to all 2½ Axis operations.
•How does the software handle tool paths when they encounter a fixture?
The tool will automatically retract and navigate around the defined fixtures. This applies to various operations, including facing and profiling.
•How do I assign a fixture to a specific setup?
You can double-click on your setup to open the Setup Dialogue and select the "Select fixtures for setup" tab. This will list all fixtures previously defined in your machining job, allowing you to pick which ones apply to that specific setup.
•Can I set a specific safety buffer around my clamps?
Yes, you can now define a Fixture Clearance Distance. This ensures the tool stays a specified distance away from the fixture (e.g., 0.2 inches) to avoid any potential collisions.
Pro-Tips for RhinoCAM & VisualCAD/CAM
•Double-check the Select Fixtures for Setup tab: When moving from Setup 1 to Setup 2, remember to double-check the Select Fixtures for Setup tab. It’s a quick step that ensures your toolpaths remain safe and efficient throughout the entire machining process!
•Centralized Definitions: Always define all your clamps and hardware under the "Fixture" item in the machining job first. Once defined there, they will automatically appear as options within your individual setup menus.
•Automate Your Safety: Instead of manually adjusting tool paths to avoid clamps, rely on the Fixture Clearance setting. By assigning the fixture and a clearance value, the software handles the retracts and path adjustments automatically, saving significant programming time.
•Setup-Specific Control: Use this feature for multi-stage machining where fixtures might be moved or removed between different setups. You no longer have to worry about a clamp from "Setup A" interfering with the tool path logic in "Setup B".
Conclusion
The 2026 update to VisualCAD/CAM continues our mission of providing "automation that makes your job easier." By making fixture management more flexible and automated, we’re helping you spend less time worrying about collisions and more time making chips.
Watch the Demonstration
Watch the full feature demonstration and see the automatic avoidance in action here: https://youtu.be/pYg8YZEg1P8