In this step you will use the Layer Manager to create some new layers and then set the active layer. 1.Display the Layer Manager. You can pick the Layer Manager icon 2.From the Layer Manager select the Add Layer icon
3.Now lets rename the new layer to Curves. First double-left-click in the Name field to activate it, and enter Curves as the new layer name.
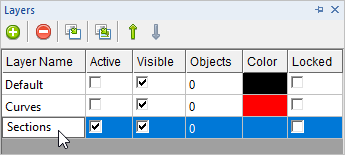
4.Repeat the procedure to create a new layer, this time named Sections.
5.Now repeat the procedure again, this time named Stock. 6.Now let's change the color of a couple of the new layers. In the Color field left-click on the color box for the layer named Curves. This will display the Colors dialog. 7.Accept the default color Black and then pick OK to close the dialog.
8.If the Layer Manager keeps Auto-Hiding to the left side of the display, select the Auto Hide pin icon at the top of the Layer Manager. You can also see that the layer named Curves was changed to color black. 9.Now let's change the color of another layer. In the Color field left-click on the color box for the layer named Stock. Again, this will display the Colors dialog.
10.This time select the Blue color and then pick OK to close the dialog. You can use different color if you wish. If you have Auto Hide pinned, the Layer Manager will stay displayed.
11.This time let's set the Active Layer. In the Active column, check the box for the layer named Default. and then unpin the Layer Manager to close it.
|